Aug 23, 2011

GClient: Google+ Client For Windows

GClient: Desktop client for Google+
 
Free application GClient integrates into the windows tray. Clicking on it will display a handy window showing your latest Google+ activities. This window allows you to post messages and to follow the activity of your circles.

GClient allows you to perform all major tasks of Google+ without having to visit the website.

Free Internet on Mobile With Internal Proxy Of Java Apps

I have been Using Free net on Opera mini and Bolt using this trick Since last more than 1 year, I never Shared this trick to any one, Im sharing it first time to my Blog readers, Try this trick in low balance.

First u need to Create the New Settings(i am Showing how to do it for airtel u can try with other networks also)  
  
For Opera Mini 4.x,5.x,6x handlers
Apn: airtelgprs.com
Proxy: server4.operamini.com (Replace proxy for other apps See here proxy list)
port: 80

In handler menu put proxy Sever Host as 0.facebook.com or any other Free Site , save it and start the opera mini.

For Other Apps
Follow The Same procedure for Other apps like Bolt,Ebuddy,Ucweb, Nimbuzz and more
replace The Proxy: "server4.operamini.com" with the internal proxy of other app.

Other Networks  
Replace the Apn with your network APN like recomwap and port 8080 For reliance and put proxy of the desired app, You can also try with Docomo,Aircel,Videocon,virgin.
If you need any assistance about this trick then u can contact me. Its 100% working in Airtel i didnt tried it for other networks, Plz try and reply.  
Note For S40 users: Prov file will be provided on Request, or u can make prov files by yourself by looking this tutorial How to Create .Prov Files by Yourself 

New Firefox 7 Beta Is Available For Download

New in Firefox Beta for Windows, Mac and Linux:
  • Optimized Memory Use: Reduces memory use and improves performance areas including responsiveness, startup and page load time, even in complex websites and Web apps
  • Improved memory management: The JavaScript garbage collector works more frequently to free up memory and improve performance when you have many tabs open or keep Firefox running for a long time
  • Enhanced Firefox Sync: Your data syncs faster when a bookmark or password is added or changed
  • Azure Direct2D for Canvas: Helps Firefox speed up HTML5 Canvas-based animation rendering
  • Web timing spec: Enables developers to measure page load time and site navigation so they can identify how to make website performance improvements
  • CSS 3 Text-Overflow: ellipsis: Additional way for developers to display CSS 3 text that overflows the layout area

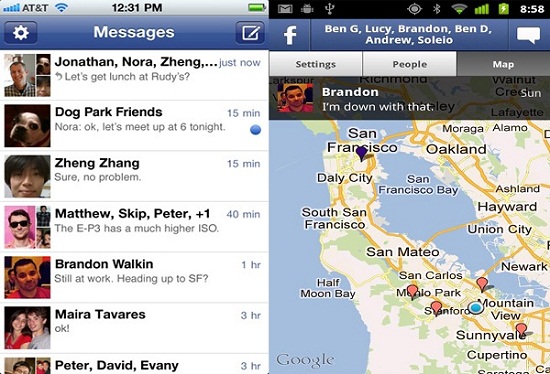
Official Facebook Messanger App For Android and iPhone

If you use Facebook on your mobile device, you might be a frequent user of its messaging service. If so, you might become the newest fan of Facebook’s just-released standalone messaging app for both Android and iPhone.

This new application includes Facebook Chat (Individual & Group), and also location sharing.


DOWNLOAD

Aug 22, 2011

Make a Folder Invisible Without any Software

Guys, as you can guess with this trick you can make your folders invisible without using any software. This is a very unusual & easy trick to make your private folders invisible to others.

A folder contains two parts: an icon and a name.
So to make the folder invisible you will have to make both the icon & the name invisible.
 
MAKING NAME INVISIBLE 

Select the folder which you want to make invisible. Press F2 key then type ALT+0160 and hit enter key. You will notice that the name of the folder has become invisible. See the snapshot below.

MAKING ICON INVISIBLE 

Right click on the folder whose name you made invisible. Go to Properties, then go to the Customize tab. Then click on the Change Icon button. Select any blank icon there. Remember there will be many blank icons (see snapshot). Just choose any one. Click OK.
Your folder is now invisible! Now only you know where the folder is located.

All Facebook Keyboard Shortcuts

Most Of People spend a lot of time on facebook then why not spend it more efficiently.There are a lot of browser specific keyboard shortcuts for facebook.You can create new messages,view account settings,View notifications etc .Once you get familiar with these shortcuts you can easily navigate on facebook.

Firefox Facebook Shortcuts

    * Shift+Alt+1: View your News Feed
    * Shift+Alt+2: View your own Profile
    * Shift+Alt+3: View pop-up of friend requests
    * Shift+Alt+4: View pop-up of messages
    * Shift+Alt+5: View pop-up of notifications
    * Shift+Alt+6: View Account Settings
    * Shift+Alt+7: View Privacy Settings
    * Shift+Alt+8: View Facebook’s own profile
    * Shift+Alt+9: Read latest Terms of Service agreement.
    * Shift+Alt+0: Open Facebook Help Center
    * Shift+Alt+?: Search
    * Shift+Alt+m: Compose a new message

Google Chrome Facebook Shortcuts
    * Alt+1: View your News Feed
    * Alt+2: View your own Profile
    * Alt+3: View pop-up of friend requests
    * Alt+4: View pop-up of messages
    * Alt+5: View pop-up of notifications
    * Alt+6: View Account Settings
    * Alt+7: View Privacy Settings
    * Alt+8: View Facebook’s own profile
    * Alt+9: Read latest Terms of Service agreement.
    * Alt+?: Search
    * Alt+m: Compose a new message

If you are using Internet Explorer then you you can use the Facebook shortcuts of Google chrome,but you have to press ENTER after each shortcut . 

Create ZIP Files Online

Friendz Now Create Zip Files Online with Nippyzip
NippyZip:
  • Visit NippyZip, upload individual files, let NippyZip do its magic then download the zipped file.
  •  NippyZip is a provider of a free and secure online compression utility for all your files.
  •  Email your zipped files to friends, family, associates or work colleagues.
  •  Download zipped files for your own personal use while on the move, in the office or at home.
NippyZip also has the Option to send the zip file as Email to your Email inbox.
Gmail: Send the files you want to zip to your Gmail address as attachments. Open the email, click on "Download All Attachments". Gmail will automatically send you a zipped file.

Aug 21, 2011

How To Enable Bitlocker In Windows 7

All of us have some private data like some personal pictures,office files or any other stuff which we want to protect from others.You can either use encryption using third-party freeware softwares like Axcrypt ,Disguise Folders or you can use Bitlocker (windows inbuilt encryption software) .Using Bitlocker you can lock your local drives .It comes pre-installed in Ultimate and Enterprise editions of windows 7 ,Vista.

Follow the Below Steps To Turn ON Bitlocker in Windows 7

1. Goto Run(Press windows+r)

2.Enter gpedit.msc in the Run and press Enter

3. Now Goto This Path Computer Configuration > Administrative Templates > Windows Components > BitLocker Drive Encryption > Operating System Drives.
Click on images to make them larger

4. In the Right Side window Pane Double Click on the Require Additional Authentication at Startup. This will open a new window.
Click on images to make them larger


5. In newly opened window select Enabled and also don’t forget to check mark Allow BitLocker without a compatible TPM option and click OK.


6.  Go to My Computer and the Hard Drive that you want to make Password Protected. Right Click on the drive and then click on the Turn on BitLocker.


7. When you click on the Turn on BitLocker option then a new window will pop up and in this window set your password in password field and click on Next button.

8.Now it will ask you where you want to save recovery key i.e. to USB, Recovery File, Print Recovery Key. Use any option recommended use Recovery Key to File. Now browse the location in your PC where you want to save this. Keep this file safe because this will help you to unlock your drive when you lost the password and click on next.
Click on images to make them larger


9. Now click on the Start Encryption button and your Encryption will start. It will take some time to complete.


10. That’s it. When it will completed, you will see a locker type image on the drive and when you double click on it then it will ask you to enter Password.